Step-by-step instructions for creating a unique and attractive vivarium from the ground up.
After over two years of planning and purchasing equipment, my dream 210-gallon reef tank was about to become a reality. In fact, I even had fish and coral, ready to go in quarantine tanks. One day, while I was staring at my empty tank, trying to envision the layout of the aquarium, my wife said something that would change everything. In what would prove to be a real Homer Simpson moment, she said to me, “Why don’t you build a huge vivarium instead?”

Photo by Paul Demas
.
“D’oh!”
I couldn’t believe I hadn’t thought of that myself! Just like that, my reef tank dreams were scrapped and my vivarium build was born.
Converting a Reef Tank to a Vivarium
The goal was simple (at least it was in my head)—recreate a piece of nature in my living room and construct a zoo-grade display of my own, with all the bells and whistles. Thus began a build that would span many months, a build that is, in reality, still ongoing.
I was off to a good start. I already had the pre-drilled, 210-gallon tank (measuring 72 inches long, by 24 inches wide, by 29 inches tall) in place and built into the wall, and it even had its own equipment room accessible from the back.
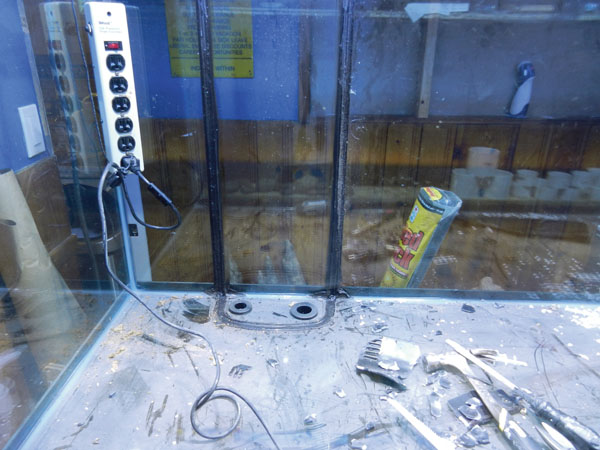
Photo by Paul Demas
After removing the overflow boxes, the author was left with a lot more space and holes for the water feature intake and return lines..
As I shifted gears from reef to vivarium, I began by planning how I wanted my vivarium to look. After much research, I decided I wanted a stream, waterfalls and drip walls throughout the vivarium. The build would include a false bottom, misting system, reverse osmosis filtration system, a high-end lighting system, sump and circulation pump, fog machine (humidifier) for effect and fans for air circulation. Months of finding and purchasing equipment and needed materials would follow, not to mention all the reptile expos I attended, searching for just the right pieces of cork, vines, rocks and countless other items.
Enough with all these words, though. Let’s get to the pictures! I hope you enjoy this photo journal of my vivarium build, and while we can’t get into every detail here, I hope that you find it both informative and inspirational.
True or False Bottoms in a Vivarium?
My first step was to figure out the main layout of the vivarium. I would be making use of a false bottom to provide proper drainage, and thus healthy plants. A false bottom is easily constructed using readily available materials at most hardware stores, including egg crate, assorted pieces of PVC piping, plastic ties, silicone and landscape fabric.
Before I constructed and installed the false bottom permanently, I simply laid out the egg crate on pieces of PVC couplings in the tank to figure out the design. I knew I would be making use of different levels to construct the stream with waterfalls, and I wanted this all figured out before I started sealing the false bottom in place. Having decided to remove the overflow boxes, I went about trying to get them out. Many hours later they were finally removed!
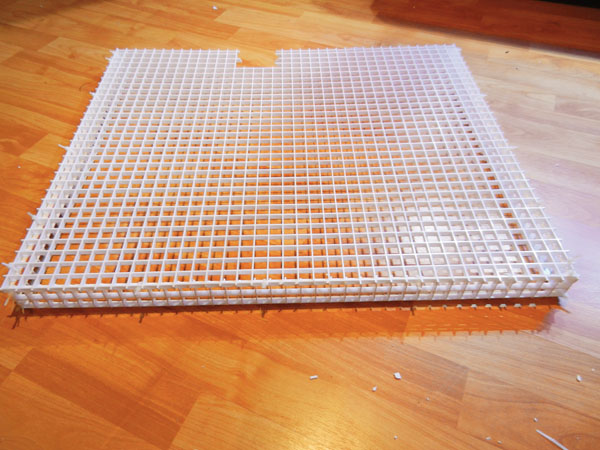
Photo by Paul Demas
False bottom frame.
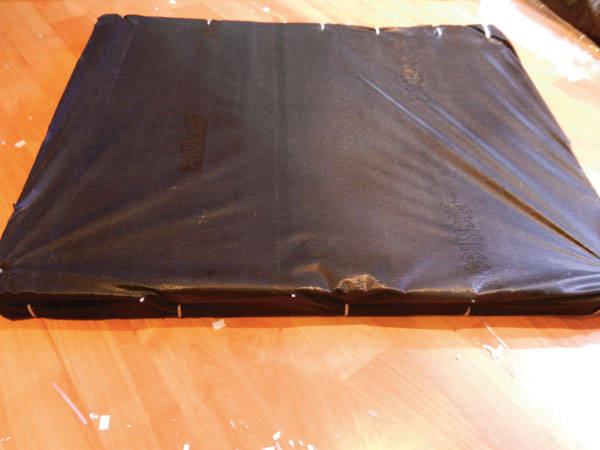
Photo by Paul Demas
False bottom frame covered in landscape fabric.
Constructing and installing the false bottom was next, and thankfully, it was a much easier project. Already having the measurements of each level, I began by constructing frames out of the egg crate. I then covered them with landscape fabric, which would keep the substrate in place and prevent it from falling to the bottom of the tank. I used plastic ties to keep everything in place.
Before installing the false bottom, I needed to install pieces of PVC piping to support it. I prefer to use PVC couplings, as they are cut to exact size and make for a perfectly level and strong false bottom. I siliconed PVC couplings of assorted heights and diameters into place, followed by installing the false bottom frames to create the different levels needed.
Plumbing a Vivarium
Before I could move on to building the vivarium’s background, I needed to install the plumbing for the stream and drip walls. This was a critical step because I wanted all the plumbing hidden behind the background so that the vivarium would look completely natural. The plumbing, while hidden, would also need to be accessible to control both the flow of the water and to handle any future repairs.
Making use of the holes already predrilled in the tank, I ran the return lines (one on each side of the vivarium) using PVC piping and assorted fittings, which would supply the stream and drip walls. These were run toward the top of the tank, where they branched off to different lines, making them very accessible. Each line would have a ball valve added to it in order to control the flow of water.
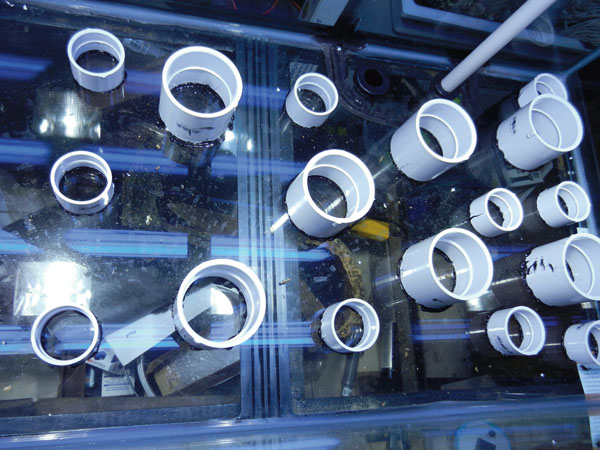
Photo by Paul Demas
Each PVC pipe has a notch at the bottom for proper drainage. The ones you see here are at the foundation of the false bottom. Soon the egg crate material will be placed across the top of them..
With the return lines now installed, I turned my attention to the plumbing behind the scenes. Given that the vivarium is installed in the wall, there is limited access from the front. However, that is not an issue with a small room behind the vivarium, where all the equipment is placed. To make working on the vivarium easier, one of the first steps I took was to install a slop sink and a separate water line for the reverse osmosis system that was already installed. I highly recommend the use of R.O. systems and the pure water that they produce for vivariums. Not only will you avoid the ugly mineral deposits on your glass, it is much safer for the sensitive skin of many herps, especially frogs.
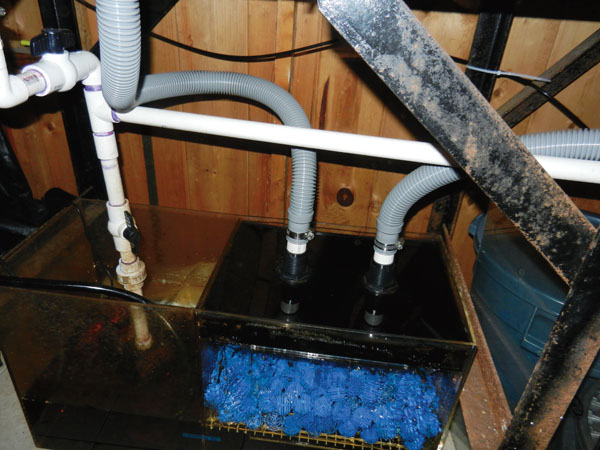
Photo by Paul Demas
The sump contains ball valves to make future work/repairs easy as each section can be isolated and shut off. The water here is brown on purpose. The author adds cork, which leaches tannins into the vivarium.
Next I placed the sump underneath the tank and installed the two exhaust lines. The return lines were then connected to the water pump and basic plumbing was completed. One project left to be completed is connecting the reverse osmosis system to the sump with a shut off and automatic top off. This automation will make life a lot easier as it will automatically top off the sump as water evaporates.
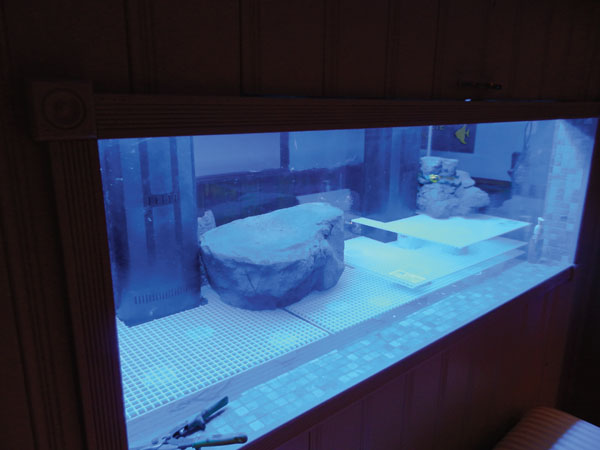
Photo by Paul Demas
The author initially designed the tank as a reef aquarium and included two overflow boxes and blue aquarium lighting. He removed the boxes and replaced the bulbs to make the tank into a vivarium.
Build a Vivarium Background
Building the background, while challenging and time-consuming, proved to be the most fun. To finally see the vivarium coming together was rewarding. My goal was for the background to look very natural and three dimensional, to have the effect that there was always something new to look at.
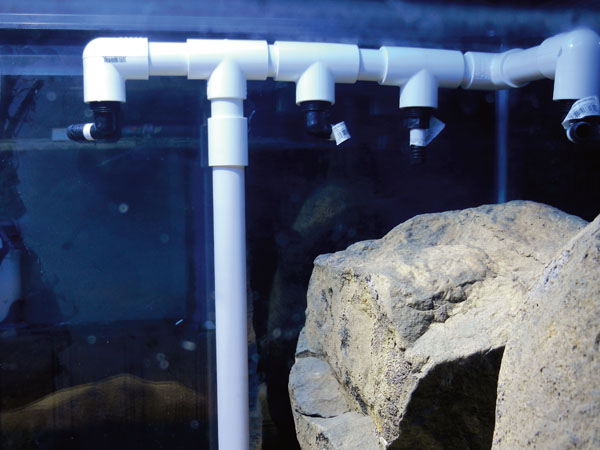
Photo by Paul Demas
Ball valves will be attached to each of these return lines.
I started the build by siliconing all the main pieces of bulk cork, cork flats, driftwood, roots and the faux Universal Rocks in place. Tubing for the drip walls and waterfalls was strategically placed as the build progressed. I then used Great Stuff Pond & Stone Foam Sealant (I prefer the black color of the pond version of the spray foam) to help hold larger pieces in place as well as fill in gaps and create ledges. This step was repeated several times to create the desired effect. Expanding foam is a very flexible product that can be used to create very realistic backgrounds.
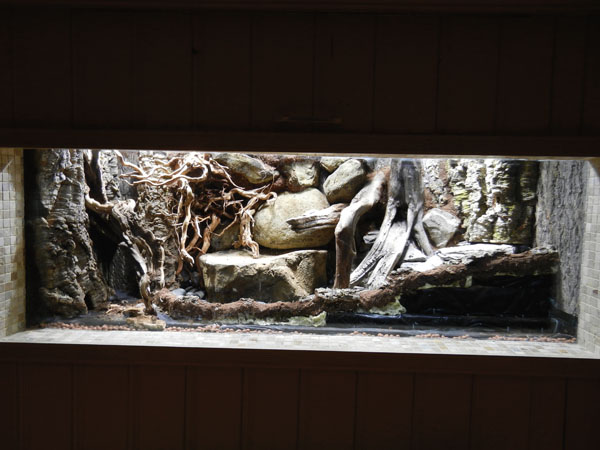
Photo by Paul Demas
.
After all the foam and silicone had cured, I used brown silicone and a mixture of coco fiber and sphagnum moss to cover all the foam and make it look very natural. Before that, though, I carved the foam for two reasons. First, I carved it because the silicone adheres to it better this way as opposed to the smooth finish you will have when the foam dries. The second reason I carve the foam is to create different shapes and give it a more natural look.
Water Features in a Vivarium
The stream and drip walls were to be a major part of my build, but they needed to be realistic and to look like a natural part of the landscape. To pull this off successfully, it was absolutely necessary that the water’s edge, the stream’s bank, look completely natural.
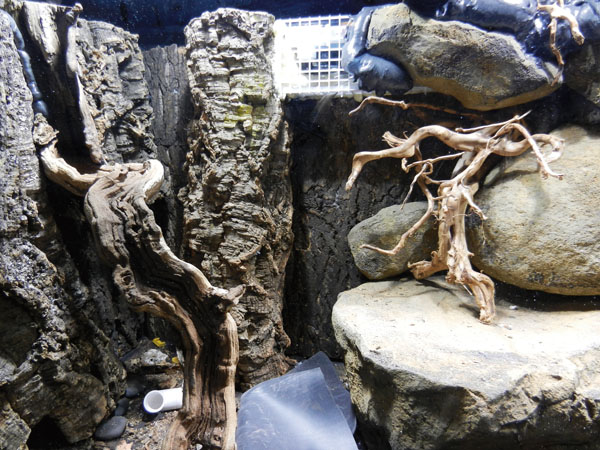
Photo by Paul Demas
Where the water feature will pool at the bottom.
To accomplish this, I tried something different from other vivarium builds I had done in the past. I decided to make use of a pond liner to build the water feature. I laid out the pond liner where I wanted the stream to run and trimmed it to size. Using the pond liner, I was able to make a gently sloped bank and create a very natural transition from land to water. To create the bank, I again turned to the spray foam. After it dried, I siliconed the pond liner onto the foam, and when that cured, I repeated the same steps that I had used to cover the foam on the background with coco fiber and sphagnum mix. Real rocks of different sizes were used to construct the stream bed and mini waterfalls, resulting in a very natural-looking stream.
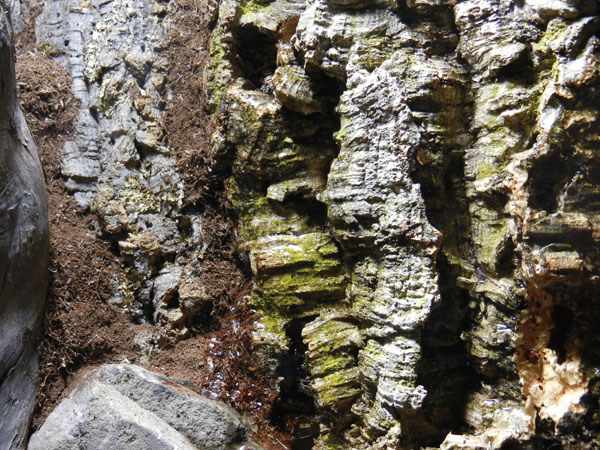
Photo by Paul Demas
Background cork siliconed into place.
Lighting a Vivarium
Having originally planned on a reef tank, I already had a high-end lighting fixture, which included eight high-output T5 fluorescent bulbs and three metal halide bulbs, as well as LED night lights. I replaced all the bulbs with more plant-appropriate lighting (combination of 5,000K and 6,500K bulbs) and installed timers for a cool, dawn-to-dusk effect. The light cycle starts each day with the LED lights coming on, followed by the T5 fluorescent bulbs and finally the metal halide bulbs for maximum lighting. These steps are reversed at the end of the day.
After some major cleaning up, I was ready to add the substrate. The proper foundation is critical to successful plant growth and long-term vivarium success. There are some excellent ready-to-use vivarium substrate mixes available. For this build, however, I made my own mixture with coco coir bricks, orchid bark, shredded tree fern and shredded oak leaves. Percentage-wise, I tend to mix equal parts of everything except the orchid bark, of which I use about half the amount of the other individual ingredients.
Vivarium Odds and Ends
With the foundation laid, there were still some important steps to complete. Given that this will be a high-humidity environment, I went with a hinged glass top, which I drilled in order to add the nozzles for my MistKing misting system.
I decided upon the Ultimate Value Misting System and purchased a few extra nozzles. In total, I have 11 nozzles (five singles and three double nozzles). I couldn’t be happier with this system!
In addition to the holes I drilled for the mister nozzles, I also drilled one hole for my fog system. My fog machine is nothing more than an ultra-sonic, cool mist humidifier that I modified for my use. By adding a couple of PVC reducers to the output of the humidifier, I was able to adapt it to my use. The fog machine does not really serve any functional purpose for my vivarium because I don’t need the extra humidity from it, and quite honestly, it is only set up for the “wow factor” when friends are over visiting.
To really trick out this vivarium with the fog machine, I hooked up a wireless controller and remote control, purchased at a local hardware store. The humidifier itself is plugged into the controller and ready for action at the push of a button. I love to hand the remote control to friends as they sit on the couch in front of the vivarium and tell them to press the on button and watch their reaction. Instant “wow”!
The top is almost completely sealed, with the exception of a small mesh strip running along the top, so condensation on the front glass wouldn’t be a major issue with this build. There is nothing worse, in my opinion, than having a beautiful vivarium and not being able to enjoy it because of condensation! In order to handle this issue, as well as provide air circulation within the vivarium, (which is beneficial for both the fauna and flora inside), I am building a custom air circulation system, making use of fans to circulate the air within. Yes, this should have been completed and installed a long time ago. In the meantime, I am making use of a couple of temporary fans hanging inside the tank to handle the condensation issue.
Time to Plant the Vivarium
Throughout the build I was collecting assorted plants. This involved several fun road trips to different reptile expos, including the American Frog Day show in 2011, botanical gardens, nurseries, a trip to Massachusetts to visit Black Jungle Terrarium supply (their greenhouse is any vivarium builder’s dream place to visit), as well as many online purchases.
Vivarium Plants Used
Aechmea kleinii
Alocasia “Polly”
Anubias coffefolia
Cissus amazonica
Ficus spp.
Fittonia verschaffeltii
Hemionitis arifolia
Hexine soleriolii
Lemmaphyllum microphyllum
Microgramma Spp.
Microsorum pteropus
Neoregelia spp.
Pellionia pulchra
Philodendron scandens
Pilea glauca
Selaginella moellendorfii (Jori variety)
Tillandsia spp.
I strongly encourage you to do your research; there are plenty of experts out there and some great forums on the web. I would to like to say a special thank you to the crews over at Black Jungle Terrarium Supply, Josh’s Frogs and Tropiflora for their excellent advice and healthy plants.Seeing plants growing in the vivarium makes all the hard work and long hours well worth it! Choosing the correct plants can be challenging, and placement of each plant is critical for best growth. It can be somewhat of a work in progress as you learn which plants will work for you, and I am continuing to experiment. Some have grown extremely well, and others have been removed or relocated within the vivarium.
The Perfect Vivarium Resident
After planting was completed and while the vivarium matured, I researched prospective inhabitants, eventually deciding on dart frogs. But which type? So many beautiful colors to choose from! I wanted a frog that could be maintained in groups, that did not limit me to pairs or trios, and of course, I wanted beautiful colors.
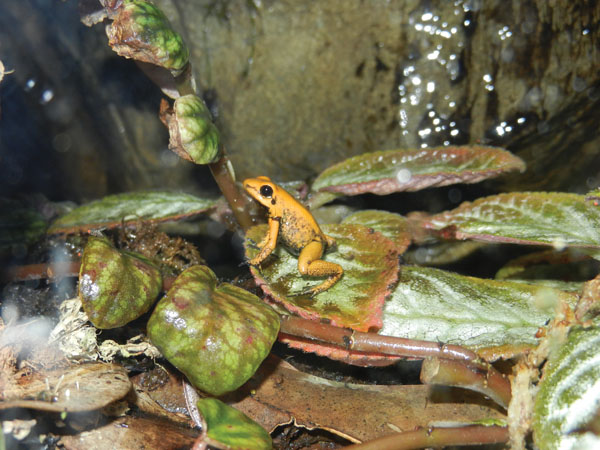
Photo by Paul Demas
Golden Dart Frog.
Then the May 2012 issue of REPTILES magazine arrived, featuring a great article entitled “Golden Opportunity” by John Clare. The golden dart frog (Phyllobates terribilis) was everything I was looking for in a frog!
While finding someone who had a group of golden frogs available was a bit harder than I expected, I was finally able to pick up five beautiful and healthy specimens of the orange morph (one of which is pictured below) from Black Jungle Terrarium Supply. I couldn’t be happier with my selection, and some of my golden frogs even jump to the front of the vivarium in expectation of dinner when I approach!
I look forward to seeing how the vivarium matures as the plants fill out and the frogs settle in. At the time the photos in this article were taken, most plants had only been in the vivarium for a month or two and the frogs were new. This is the real challenge of any build—patience as it grows out! I hope that you have enjoyed this article, and that it inspires you to build your own slice of nature! REPTILES
Paul Demas has kept and bred herps for more than 25 years. He currently works for the pet product manufacturer Penn-Plax, where he heads up Reptology, the company’s reptile division. He can be reached at pdemas@pennplax for more info on this and other builds.