Make your indoor turtle or tortoise table housing stand out.
Many aquatic turtles bask over water, so water features should accommodate this activity with a floating or stationary basking area. Remember that the water in a shallow bin heats quickly when under a basking light. Submerged heaters can present a similar problem. Basking sites extending over water double the use of that space. Provide a ramp or other means of egress to allow turtles easy entrance and exit from the water.
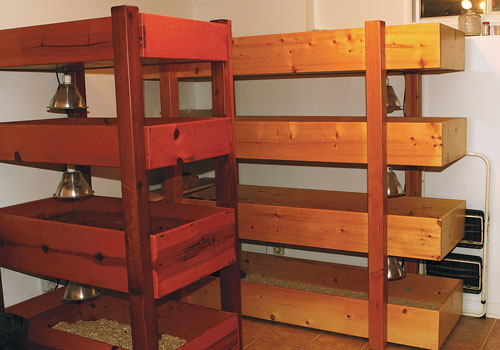
Photo courtesy E.J. Pirog.
Ed Pirog's turtle tables look deceptively simple, and they make effective use of multilevels.
Aquatic species require sufficiently large water areas to exercise, swim, feed and thermoregulate. Many never leave the water, and these species might be more appropriately kept in a primarily aquatic enclosure.
Many terrestrial chelonians have a large home range, and they daily utilize multiple hiding and basking areas. Many burrow and dramatically alter all but the sturdiest plantings and habitats. Most also adeptly climb, and enclosure overhangs and tops minimize escapes. Enclosure sides require additional height near protruding features, especially hiding areas. Hides can have usable tops, doubling usable space, but note that this can create escape routes.
Other Options
If building isn’t your forte, a bookshelf on its back would do the basic job. Shelves can give structure to the table, or they can be used as dividers or as a prop for lighting. Remember that most bookshelves don’t provide sufficiently high walls, so they likely will require a top or overhang of some kind.
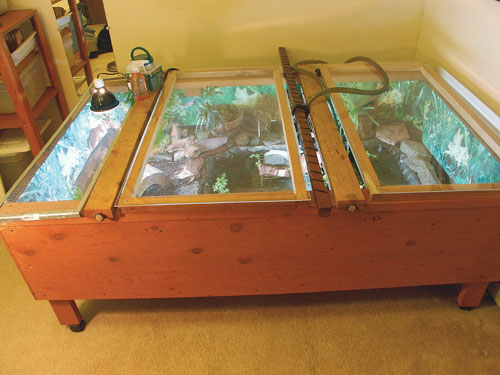
Photo courtesy Mary Hopson
Homemade turtle tables are used often with terrestrial species, but with some tweaks, a semiaquatic setup can be constructed.
A Waterland Tubs setup is more elaborate and expensive, and it provides a lasting, visually appealing and easily maintainable “table” with all the bells and whistles available. Waterland’s varied designs can accommodate aquatic species, which need mostly water and less land space, and terrestrial species, which need mostly land space. These lightweight tubs can be used indoors or out, they withstand temperature changes, and they have an easy-grip access ramp.
There are also premanufactured table-style enclosures on the horizon. Made of solid wood, these products for indoor and outdoor use can be dismantled. They also have removable side panels, and basking and shaded areas. These playpens differ from the table. Ideal for outdoors, these enclosures have an open-bottom section for grazing and a removable floor in the shelter to facilitate cleaning.
Environmental Considerations
Ultraviolet light and heat sources should be spaced to create a thermal gradient. This provides warmer and cooler areas for turtle thermoregulation. Plants and rocks can be used to provide a variety of microclimates. Tortoise and box turtle enclosures also require water features, so turtles can soak and feed. Also take into account some Asian species are more aquatic than North American box turtles (Terrapene spp). Many keepers treat Cuora and related species as semiaquatics.
Housing alien species together presents a problem regarding disease. Avoid this at all costs. Housing species with drastically different habit needs or lodging carnivores with herbivores can lead to disaster. Knowing the ecosystem of your charges is also critical. Many habitats vary in temperature, humidity and photoperiod.
Although natural habitats can be visually appealing, they hold their own problems. Turtlekeepers must consider not only the appearance but also the ease with which they can be cleaned and maintained. In general, complex and elaborate enclosures are more difficult to maintain. Maintenance difficulty is directly proportional to how often it will be done. However, if keepers plan for this in advance, the task is not too daunting, and the result is very rewarding.
I’ve saved lighting for last. Although very important, it has been adequately covered elsewhere.
In the wild, most reptiles are able to synthesize vitamin D3 from the UV in sunlight. Together with proper heat, this vitamin helps turtles metabolize dietary calcium. Many chelonians extract a large percentage of their daily vitamin D3 from food, but food alone is inadequate. So, chelonians housed indoors are highly dependent upon sufficient amounts of artificial lighting.
A UVB source helps turtles synthesize vitamin D3. Mercury vapor bulbs may fulfill both basking warmth and UVB requirements, but be aware that no bulb is as effective as sunlight in supplying vital UVB. All enclosure lighting is best located at the opposite end from the hiding areas. As stated earlier, this helps provide the best temperature gradient.
Build a Table
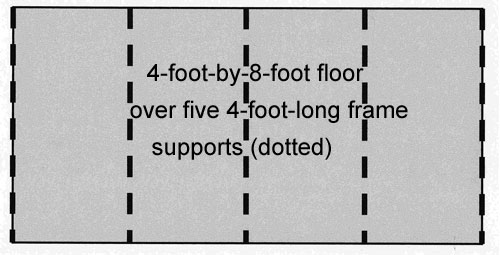
A 4-feet-by-8-feet table is generally a good size for a few small or medium-size chelonians (see “Is My Turtle Table Big Enough?” sidebar). Using standard sizes reduces cuts for carpentry-challenged turtlekeepers. This table has a floor measuring 4 feet by 8 feet and 24-inch-tall walls before attachment. The actual wall height is ultimately only 20 inches.
I use descriptions from the “Supplies” sidebar when referring to wood cuts, so see this sidebar for material and size information.
1. Begin with the turtle table floor. Start with the plywood floor and five frame supports. Mark the floor into five even sections widthwise. Lay the floor on the five frame supports, so each support corresponds to the widthwise mark. Drill and screw through the plywood floor into each frame support. Using decking screws makes it easier to break down the enclosure later. Now you have a finished floor.
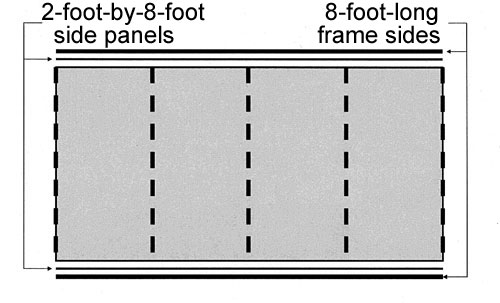
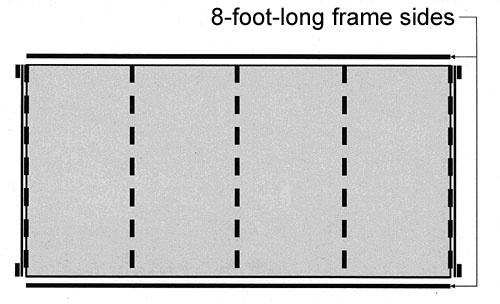
2. Next construct the table’s two longer sides. You need two side panels, two frame sides and the finished floor. One at a time, lay each side panel against the finished floor and the ground. Keep panel ends even with floor ends. Place one of the frame sides even with the ground and finished floor. Drill and screw through the frame side and the side panel, so screws go into each of the floor’s five frame supports. Repeat this process with the other frame side and side panel. Now you have a finished floor with panels on the longer sides.
3. The table’s shorter sides are next. You need two end panels, four frame ends and the finished floor. One at a time, lay each end panel against the finished floor and the ground. Drill and screw one end panel into the finished floor’s outermost frame support. Next place a frame end even with the top corners on the outside of the table and over the bottom frame sides. Drill and screw the bottom of the frame end into the outermost frame support, but do it under the plywood floor. Repeat this process with the other frame end. Now you have a finished floor with panels on all four sides.
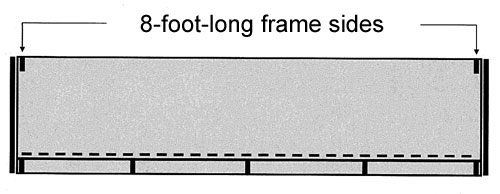
4. Adding side tops for additional support is the next step. You need two frame supports and the turtle table. Place one frame support inside the side panel at the top end of one of the table’s end panels. Drill and screw through the frame support and end panel, so the screw goes into the table’s frame end for additional support. Repeat this process with the other end. At this point the turtle table has two side tops.
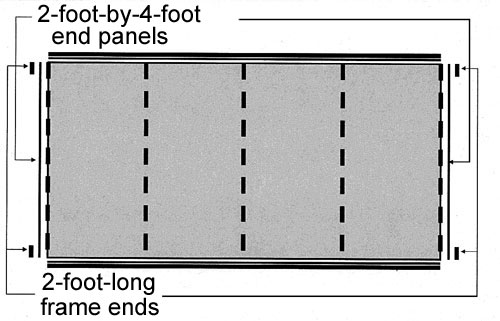
5. Adding two more pieces finishes the table. You need the two remaining frame sides. Place one frame side along the turtle table’s length. Even it with the table’s ends and top. Drill and screw through the frame side into the top supports. Repeat the procedure on the other side of the table. You now have a completed tortoise table.
From this point the possibilities for enhancing your tortoise table are endless. A lip extending over the top helps prevent escapes. Wheels make the table movable. A Plexiglas front adds to your viewing enjoyment, and a hide box with a ramp to the top adds to available space.
Thanks to World Chelonian Trust’s board members and online community for useful advice and pictures.


