Build a large cage for your caiman as they can grow six to eight feet.
As a keeper of spectacled caimans (Caiman crocodilus), I know they start out small but quickly grow to an adult size of 6 to 8 feet, and they need enclosures that grow along with them. At minimum, a caiman enclosure must contain a water area large enough for swimming and a land area that permits movement. Some countries regulate enclosure sizes for different animals, so research the laws for your area before taking on an enclosure construction project. Of equal importance is that you research the kind of animal you wish to keep and its captive care needs before you actually buy it.
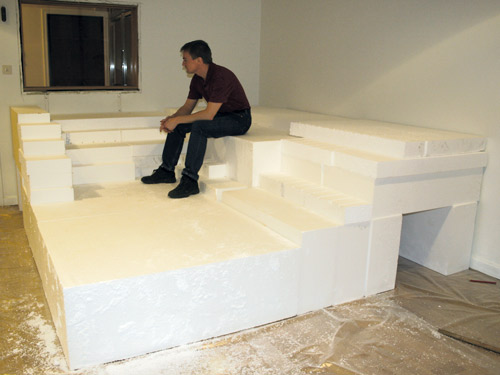
Photo by Ragnar Lonn
The author sits upon plastic foam blocks used to configure the enclosure’s shape.
To date, I’ve built three enclosures. The following steps will take you through how I built the last one and incorporate knowledge I gained from the first two.
Step 1: Block It Out
First, decide the shape of your enclosure. How big will the land and water areas be, and what will they look like? Sketch it on paper if that helps. It was difficult to walk around inside the second enclosure I built. Caimans were almost able to leap up to the lamps, which can be dangerous. So I designed the new enclosure with a generous height to make certain that the caimans could never reach the ceiling fixtures.
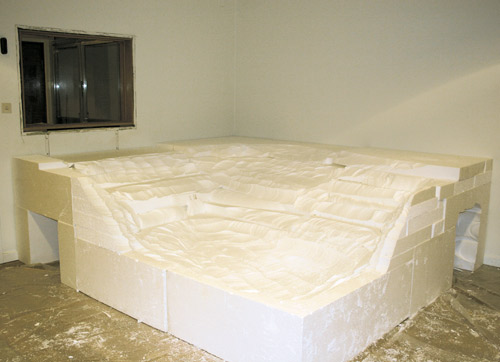
Photo by Ragnar Lonn
The author used a plastic-foam cutter to remove sharp corners and dig out a deeper water area.
Once you decide on a layout, pick up plastic foam blocks to construct the enclosure bottom. “Massive” plastic foam is fairly strong and can take a lot of weight. It’s great for heat insulation, it’s and easy to cut and shape. Plastic foam comes in different qualities and with different ratings for how much weight it can support per square foot of surface area. I chose one of the cheaper types. I calculated it would still be able to support the weight of the 400 or so gallons of water in the enclosure. Purchase different sized blocks, and lay them out until you achieve the interior shape you want.
Step 2: Shaping
To remove sharp corners and dig out a deeper water area, you can use an electrical plastic-foam cutter. You might be able to rent one of these from the business that sold you the plastic foam blocks. Please note that when you cut plastic foam by melting it, toxic fumes are emitted. Wear a breathing mask with a carbon filter, and be sure to do the work in a well-ventilated area.
If you want to avoid all the work and hazards of plastic-foam cutters, just use a standard wood saw to shape the plastic foam. Scooping out holes can be difficult, but an electric drill with a wire wheel makes it possible. The only drawback is that the drill setup can get messy. It spews millions of little plastic foam clippings everywhere. Expect to vacuum yourself and the whole room afterwards when using this method.
Step 3: Reinforce and Rig
Preparing the base for the concrete is the next step. Concrete needs reinforcement or it will crack. The more reinforcement the better. Use real iron bars if you can, but chicken wire is also easy to bend and work with, and it can be used as reinforcement for small installations even though it doesn’t have the strength of iron bars.
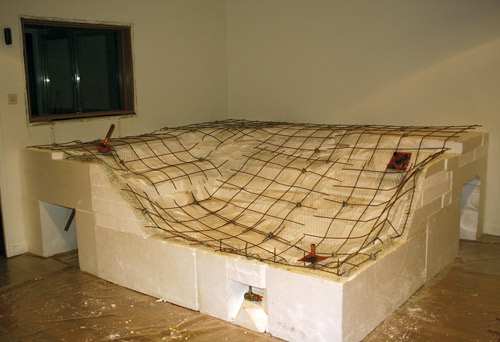
Photo by Ragnar Lonn
Iron reinforcements and chicken wire were used to help support concrete once it was poured.
During this stage you must also have a plumber — or yourself if you are so inclined — prepare the water inlets and outlets. These fixtures consist of a copper pipe going through a copper plate. The plate is there to provide more surface area, so the materials above and below the plate can seal against it, making water leakages less likely where the pipe goes through the bottom of the enclosure. I had a plumber attach two inlets and outlets on the side and one set on the bottom before I finished installing the remaining concrete reinforcements.
Step 4: Glass Support
If you want glass sides on your enclosure, you must provide sufficient support. Glass is heavy and requires concrete frames to hold it. But first you must build a mold to pour that concrete into. Mine was made from wood.
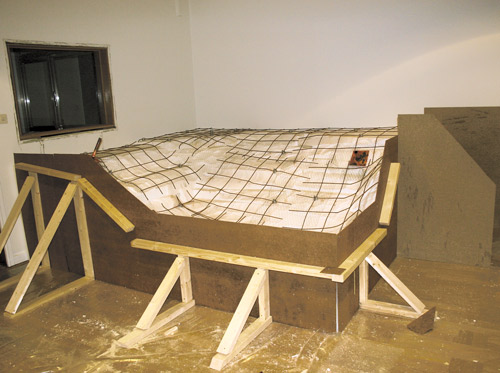
Photo by Ragnar Lonn
The wood frame you see here will ultimately support the heavy glass windows making up the enclosure’s sides.
Keep in mind that your concrete mold needs to be sturdy, or it will warp. If in doubt, make it stronger than you think it will need to be, or better yet, ask someone with experience casting concrete. If you want big glass windows in your enclosure like I have, make the concrete foundation at least 5 inches thick, and reinforce it with iron bars.
Step 5: Add Concrete
Pour concrete into the mold around the edges first, and then add a layer of concrete to the rest of the enclosure. Concrete should come up to the bottom of the water pipe’s copper plate and seal against the underside of the plate.
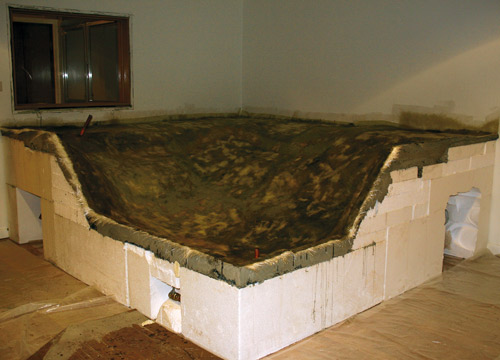
Photo by Ragnar Lonn
Fiberglass has been added to the enclosure. The entire bottom has one layer. The area below the water level has three layers, and the above-water area has two.
Step 6: Fiberglass and Fumes
Once the concrete sets, apply fiberglass matting and polystyrene on top of it to make the whole thing watertight. Fiberglass is extremely strong, flexible and durable. Combined with the firm concrete foundation, it makes the enclosure hard to sabotage — even for a crocodilian.
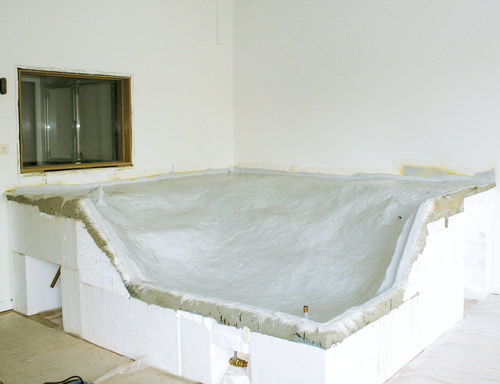
Photo by Ragnar Lonn
After painting on the final coating, the author sprinkled sand on the surface so the caimans could have better traction when moving about.
Woven fiberglass matting can be bought in different thicknesses. I used the thickest kind, and because of this, I only had to lay two layers of fiberglass. A thinner mat is easier to work with, but it requires more layers to make it watertight. Fiberglass sheets can be cut with scissors or just torn apart. Tearing them apart is actually better because that will help avoid sharper edges, resulting in a more seamless fiberglass layer when you’re done. Fold the fiberglass up against the walls of the room to ensure water doesn’t splash between the enclosure and the wall.
It is important to saturate the fiberglass with melted polystyrene and make sure no air is left in the material after it’s laid out. I used paint rollers to apply the polystyrene and small brushes with long handles to get it to follow nonflat surfaces, such as corners.
Cover the edges of the copper plate with a layer of fiberglass and polystyrene to seal the area and make sure the water won’t leak through the bottom where the pipe enters the enclosure.
One drawback with fiberglass is that it’s messy to work with. The woven fiberglass sheets release tiny “needles,” which can pierce your skin and make you itch all over. Wear overalls and gloves, and you’ll be spared some but not all of that discomfort.
Then there’s the polystyrene, which is toxic and probably carcinogenic. It also doesn’t smell very good. Aside from the styrene fumes, which can be difficult to get rid of, polystyrene also irritates the skin. While applying it, wear a breathing mask with active carbon filtering, overalls, gloves and eye protection. Good ventilation is also a must. Consider setting up temporary construction ventilation with inflatable tubes and big fans if you feel your ventilation isn’t sufficient.
To get polystyrene to harden, you use an accelerator. This is even worse than styrene in all aspects — it smells worse, irritates the skin more and is probably more lethal overall. So, use protective gear and ventilation, and take all the right precautions!
Step 7: Paint on the Top Coat
After the fiberglass and polystyrene layer is done, it is time to put on a top coat. Mine was a polystyrene-based paint solution mixed with wax. After the paint has been applied, the wax floats to the top and seals off the paint from the air, so it can harden completely.
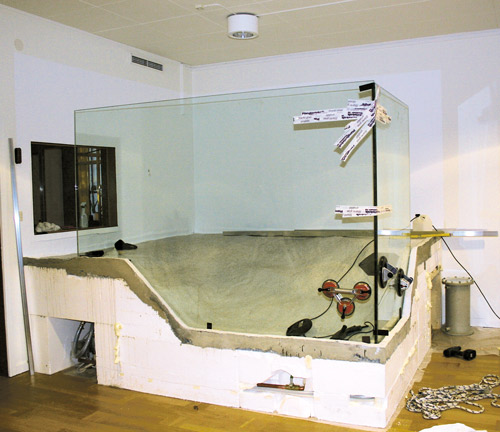
Photo by Ragnar Lonn
The author used silicone to glue the windows together. He placed tape along the sides to offer temporarily support while the silicone dried.
Polystyrene never completely sets as long as it is in contact with air. It only sets and hardens after you seal off the surface with the top coat. For my enclosure, I also added sand after applying the top coat to provide the caimans with some traction.
Step 8: Protection
At this stage your enclosure base is ready. I had incorporated two existing walls into my enclosure, so before starting on the structure’s upper part, I protected those walls. Select a water-resistant paint designed for bathrooms, so the increased heat and humidity from the enclosure’s water and lighting won’t cause damage.
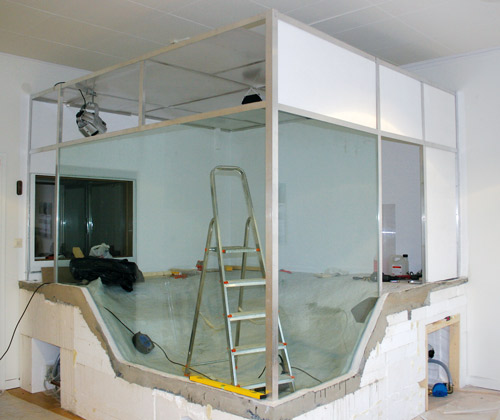
Photo by Ragnar Lonn
Once the enclosure's frame was in place, the panels were installed.
Step 9: Window Placement
The next step is placing the glass windows. Mine are made from three-fourths-inch-thick laminated glass. They are very heavy; the large window weighs about 400 pounds. Glass of this measurement is overly thick, especially if you consider that zoo enclosures commonly use glass less than one-half-inch thick for this kind of habitat. But it is nice to know that the glass is unlikely to crack no matter what the caimans do.
Glue the windows together using wet-room silicone. I use obscene amounts. It’s cheap and anything that makes a water leak less likely is worth it. You can use the same type used for building aquariums.
Step 10: Frame It
It is now time to construct the walls and ceiling. For this I needed a frame. I usually build frames from aluminum because it is fairly easy to work with, light and doesn’t rust. The aluminum profiles should be screwed together, and they should also be glued with silicone to the walls and windows.
Step 11: Plastic Panels
The next step is to place plastic panels along the top and sides of the enclosure. I used plywood boards on mine and painted them with water-resistant paint, but I suggest using plastic panels. I had hoped the water-resistant paint would keep the boards from absorbing moisture, but they did anyway. As a result, I had some buckling and warping of the panels. I plan to replace them with plastic soon. Make the enclosure’s ceiling out of double-wall plastic, the same type used in greenhouses. It insulates the enclosure a little, and it protects against water condensation on the inside.
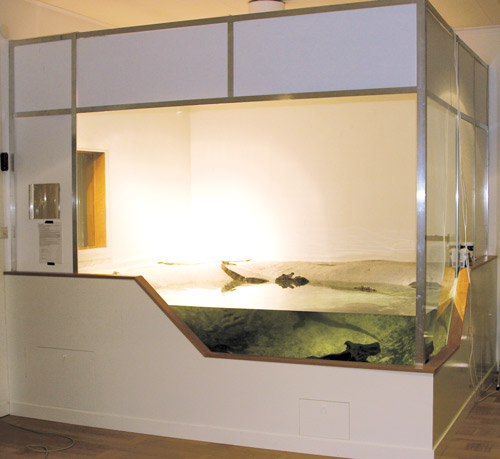
Photo by Ragnar Lonn
The author’s completed enclosure measures 10½ feet long by 10½ feet wide by 8 feet high.
Step 12: Filtration
Installing the water circulation system is the next step. Mine consists of a standard — albeit heavy-duty — aquarium pump, two water filters and an electric water heater. The enclosure’s water goes into a large filter canister full of plastic biofilter balls and then into a smaller standard filter with a washable nylon filter cartridge. Then the water moves into the pump, which propels it through a flexible plastic tube to the other end of the enclosure. There it passes through the water heater and is injected back into the enclosure.
The water heater I use is a standard household component. It’s ideal for heating the water in the crocodilian enclosure because it has enough power (2 kilowatts) and several safety features, such as a temperature sensor that shuts off the heater if it overheats, which can happen if the aquarium pump fails.
I used a perforated piece of stainless steel to cover the water inlet and held it in place with two wing nuts. Because of the location and size of the stainless steel filter, it doesn’t clog easily. It’s also easy to remove and wash. This is an improvement from the water inlet in the second enclosure I built, which had its water inlets on the bottom. Even though the inlet filters prevented larger particles or small fish from getting sucked in, they clogged continually, cutting off water circulation.
Step 13: Lighting
My lighting arrangements consist of a large 575-watt halogen basking spotlight, a smaller 300-watt halogen basking spotlight and a 150-watt mercury discharge spotlight that shines down into the deep part of the pool. My caimans also have one land area with no direct light, so they can choose several different temperature gradients.
Step 14: Enjoyment!
The final step is filling the enclosure with water, tailoring it to the caimans’ specific temperature and water-quality needs (here’s where your species-specific research comes in), and letting them enjoy their new home.
Standing the Test of Time
Enclosure three has been in operation for two years now, and it has worked well. There are always things you want to change after building an enclosure, but considering space constraints and my schedule, I am happy with the result. Creating enclosures is great fun. I seem to forget the distress that comes with the tough parts. Now I am almost longing for the next time I build one — because next time it will be perfect!